Thursday, April 14, 2016

Digital Photography - Shutter Speed A+

Shutter Speed Project

Recently in Digital Photography our class was assigned a project based on shutter speed and understanding it's effects on the photograph. So before talking about my photos I would first like to discuss about really is shutter speed and how does it effect one's photograph as some of you might have never herd about this term before. The shutter speed is simply the length of time that the light hits the film or sensor allowing the image to be recorded. Each variation in speed is known as a stop.

You can get really creative with varying shutter speeds as we shall see in a moment but there is one important factor that you should always remember whenever you adjust the speed of the shutter up or down, you must compensate in some other way, normally via the aperture but you can do it via the ISO setting or use of filters. As you are letting in less light with a faster speed, you need to compensate and allow more light in via a larger aperture (creating less depth of field) or a higher and more sensitive ISO setting, and vice versa. Your style of photography and what you wish to photograph play the biggest determining factor in what shutter speeds you use. For instance, for me I prefer faster shutter speeds to slow objects down.


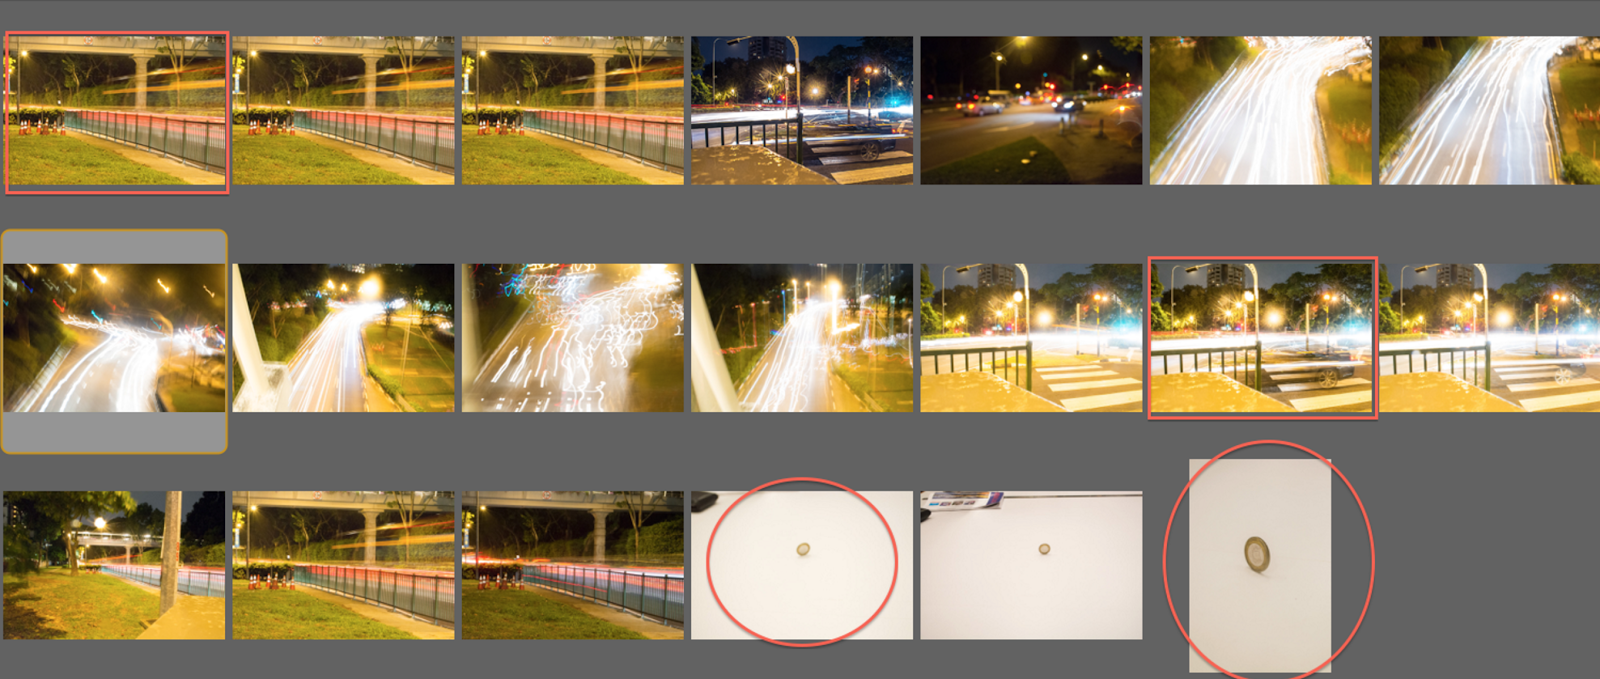
This above is my Digital Contact Print. This is part of my digital workflow. Following a digital workflow is a crucial part for every photographer as it helps the him/her get into a routine of clicking, editing and publishing. the objective of this assignment was to understand the meaning of shutter speed thus all my images here are either blurring the subject or freezing it. First I would like to discuss the ones which are freezing the subject:

The first one would be the top right one. It's a picture of a cutting machine. I used a high shutter speed to get into focus not only the machine but also the dust particles coming off the machine. I also had to use Matrix Metering to get the best exposure as the surrounding was quite dark.
The second one would be the 3rd one on the first row. It's a classic example of high shutter speed in which someone is jumping up and the camera catches them while they are in the air. I decided to use this as most people with low skill level would use fast shutter speed just to get their friends stuck in the air. I also had to play with the exposure dial in this pic as the surrounding was quite bright.
The third one would be the image with the highlight square around it on the third row. I decided to chose this due to 2 main reasons. First of all, the water slowed down shows a different perspective than if one looks through naked eye. Second, the surrounding helps frame my subject of the water droplets.
 
The forth one would be the one with a square around it in the forth row. I had to set up the subject in the picture. So some might have already noticed, I like to play with freezing water in mid air. This was special to me because one can really see the water taking a ballon like shape.

Now I would like to move onto my blur motion pics. To do this a photographer has to decrease the shutter speed according to the situation. Just a reminder that if the speed is below 1/20 then it's recommended to have support or a tripod.

My first picture slowing motion down would be 5th one in the first row. I chose this because it shows the power of the shutter speed as it turns a normal image of two people walking into an image which shows their motion while they were walking. For this image, I had some problems with the exposure thus I spent a long time playing with the exposure (+/- dial) to get the right lighting.
My second picture for this section would be the last one in the same row. This was when I started understanding the concept of shutter speed. I slowed my shutter speed to about 1/8 and I told my subject to move back in the chair. I effect I got was almost like a ghost effect because one can see a ghostly figure in the initial place and a more solid figure in his current place.
Th third one would be the first circled one. I chose this as the slow shutter speed not only slowed down the water, but also the light with it. Thus the effect I got was of a jet of water and light moving in the same pathway. 
 
The forth one would be the last image in the digital contact print. I would consider this one of my best images as it is a classic example of showing motion. The slow shutter speed lead to streaks behind the goldcart while it was moving. The angle helped too as it puts more significance and focus on the cart. For this one too, I had to play with the exposure as the shutter was open for a long time which lead to more light coming in.

Now I would like to talk about the pictures that I edited using Adobe Photoshop after the images were taken. Our teacher introduced us with many new tools such as high pass, motion blur filters, saturation, vibrance, exposure, blacks and many other tools


For this image I used various tools to get this final product. First I had to lower the exposure and darken the blacks to get a focus on the water droplets. I also had to use motion blur to blur out the righten wall and give it a liquidy feel to it as before it was too dry and solid. I also decided to smoothen the stop left as those black and white lines looked to rigid. The only thing I wanted to be rigid and still in this image were the water droplets.


For this one I had to use 3 major tools to get this final product. First of all my background was really distracting so I decided to completely blur out the back using the motion blur filter and then decided to keep the background detail intact. Next I decided to play with the exposure as the white looked darker than it should have looked. At last, while playing with the colours I realised that making the whole image black and white would be the best effect with a hint of sepia toning would make it less eye catching and put the subject more in focus in the viewers mind.


For this image I played with many different tools to get this effect (my psd file was 65 mb). First I increased the contrast to see the gold cart and make it's red and orange standout. Then I sharpened the background put made it brighter so you can only see the outline of the background or else it could be gotten distracting. Then I set another layer for the ground and made it darker as before the light ground wasn't adding to the image. 


For this image the subject was quite dark so there wasn't a lot to play with so I decided to play with the motion. The background has lights, solid lights (check the digital contact print). Thus I decided to blur them completely and turn the solid lights into streaks pointing towards the main subject.

Successes and Challenges:
This project overall was a great accomplishments due to my successes, however there were also many challenges that I had to overcome to get there. For example, one of my greater challenges was setting the right exposure when the shutter was low as a lot of light was coming in. Almost 15 of my 200 images were just the colour white. Thus I had to play with my exposure, and sometimes even the ISO to get the subject in the picture. I knew I could edit the exposure issue later in photoshop however it was important for me to use slow shutter speed and getting a good picture without the help of photoshop. Another problem I faced was during the editing day. It was remembering the name for each effect and where to find it on the screen. For example, I spent a long time trying to find Overlay as I confused it with the high pass. Even though, this was time consuming I think this will help me in the future as I will get more familiar with the tools.

In this project some of the main successes came during the high shutter speed shots. I find them easy as camera-shake doesn't have drastic impacts on the image and setting exposure isn't that hard. The only thing one needs to do is being at the right place at the right time and knowing what to slow down in the surrounding. Another one of success would be understanding the concept and importance of the shutter speed as it's almost a stepping stone for a someone who uses automatic mode to a photographer who uses the manual mode.

Digital Photography - Shutter Speed A

Shutter Speed Project

A shutter is essentially a device on a camera to allow varying amounts of light in to change the nature of an image. On a digital camera, the shutter has two main functions, which is controlling the amount of light, as well as giving a sense of motion to the photo. The longer the shutter is open, which is the slower the speed, the more light comes in, with less "noise" visible in the shot. On the other hand, with a faster shutter speed, which means that the shutter is not open as long, less light will come into the photo.

Faster shutter speeds are used for motion shots, as it won't have as much of a blur effect (or an effect at all) on the image, while slower shutter speeds will blur the image.

Digital Contact Print:

I chose the circled photos as my freeze motion images because I think the fast shutter speed really works well to emphasize the movement. I chose the photos that have rectangular boundaries around them as my blur motion photos because I felt that they emphasized the motion and movement of the subject.


BLUR MOTION/ SLOW SHUTTER SPEED


I chose this first image to blur because it showed Tushar running, which made sense to blur his arms and legs to give the sense that he was moving very fast, despite the fact that he was lightly jogging.


I chose to blur this photo also because it already had motion in it, however the limbs in motion were still clear thanks to the fast shutter speed. As a result, I decided to use the motion blur tool to emphasize the movement.

FREEZE MOTION/ FAST SHUTTER SPEED


I chose this photo of Austin jumping to emphasize the pose in midair, while increasing the contrast with the red track behind him.


I thought that this image was pretty interesting since it showed the slow motion of the water fountain to the drain. As the drop of water had not yet broken up upon collision, I thought this would make a good freeze motion image.

Challenges/Successes

At first, I found the editing on Photoshop to be difficult, particularly the motion blur, but after watching the tutorials, I figured that out. In addition, I found the brightness in some of my shots to be an issue, but I figured out the brightness composition and ISO over time. Overall, I think that once I figured out how to use the settings on the camera as well as editing on Photoshop, the quality of my final product improved.


Everything is present and evident with showing and explaining how the shutter affects the subject in the picture. To move towards a A+, pictures taken outside of campus would yield more engaging and interesting pictures.


Digital Photography - Shutter Speed B+

Shutter is the feature that affects how blurry or how clear the picture is. If you have a fast shutter speed, you can freeze a picture vs if you have a slow shutter speed, you get a blurred picture. 

This is my digital contact print. I selected the images in red as the most interesting from the pictures that I had taken. The pictures were taken around campus such as in the gym during my basketball practice, in the art room, and finally around the science block and the library. 

This is a photo from basketball practice. It is a ball going through the net. It it completely frozen in the motion, therefore it is a frozen motion image. 

This is a picture of one of my friends shaking a can of coke and the liquid is exiting the can and i got a very clear picture due to my fast shutter speed. 


I think the most challenging thing about the freeze motion pictures is trying to get the picture on the first time. There was only so many times I could have my model dump out soda before i didn't have any left. I think i captured the freeze motions very well. I had a lot of fun shooting.

This is Natalie flipping her hair. it is a blurred image because her hair (the moving object) is blurred. 

This is my model Kara shooting a basketball. The main focus, the ball, is blurry, therefore making it a blurred image. 

I didn't have any challenges on taking these photos except the light. Sometimes the exposure would be too long or too short causing them to be really dark or really light. I believe both of these pictures are successes!


The Blog Post: Everything is in the blog post for the completion of the project. The student could have described in a sentence or two what the final selected images in the digital contact print were.

The Images: The examples capture both freezing and blurring motion. The example of the soda pushed out of the can is taken in a dark corridor and would need more light (flash, or in a lighted area). The white balance with the image of the girl flipping her hair is off a bit (too warm).  

Digital Photography - Shutter Speed B

The shutter speed setting on a camera affects how long the camera's shutter stays open. The longer the shutter is open the more light it lets in and the the more blurred the motion is and the shorter the shutter speed is the sharper a moving object is and less light is able to enter.


I chose there four pictures beacuse I belive that they where able to best show how I could freeze and blur motion by changing the shutter speed


These two pictures demonstrate how I was able to blur motion in an image by slowing down the shutter speed and keeping the shutter open for a longer period of time


In these two images I showed how I sped up the shutter speed in order to freeze the subject in motion.


Some challenges I had during this project was trying to take a picture with good lighting, even though the camera was automatically calculating that apature for me and I was able to change the exposure some of my pictures still came out too dark or too light. To edit these pictures I used a filter in Photoshop inorder to blur the image and then applied a layer mask to make it so only the background was blurred while the subject remained in focus.


The Blog Post: All content is posted, but the explanation is very brief in the digital contact print and the final images. There is also some spelling errors in the the descriptions that needs to be revised.

The Image: Each of the images have been taken outside of the school that are more visually engaging. The last image could have been cropped in further to show the details of the moving cars, which is the main subject of the picture.  

Wednesday, April 13, 2016

Digital Photography - Shutter Speed C


Shutter speed is the exposure time or length for how long light is let into the camera, creating a blurred motion effect or still motion depending on what you set the shutter speed for. The amount of light that reaches the film or image sensor is proportional to the exposure time.


The first picture shown is a still motion picture. The shutter has a high number setting letting the motion be captured without a blurring effect.
still motion of spinning fan 

blurred motion


Some difficulties I have come across have been light exposure while taking photos and just overall camera knowledge since I haven't really used a digital camera before. I think some successes have been the first still picture with the water. I think the lighting and editing overall of the photo is sharp and well contrasting because of the basic background of the photo.


The Blog Post: The order of the content of the work is not chronological (explanation of the shutter and how it affects the image, digital contact print, description of the digital contact print, final edited images with a description, successes and challenges to the project).
There is no explanation to the digital contact print. The layout and the font size and type is unorganized and varies.
The Images: There are only three images for the final. One more example of frozen motion is needed. The last image when viewed larger does not increase in size to be able to view the details.

Tuesday, April 12, 2016

Digital Photography - Shutter Speed C+


Shutter:
The shutter is a curtain that can be opened and closed. The defining feature about the shutter is that the time in which it can be opened can be adjusted.

Digital Contact Print:

The top left image was selected due to the blur that is happening in the back of the image. When I first saw examples of images there was only motion blur occurring in the front of the image. To try a new angle I took pictures of traffic at night from 5-ish meters away from the road. This allowed for the crisp gate in the front of my image that is in front of the motion blur.
The second motion blur photo I selected due to the length of the shutter speed. For this image I had a 15 second exposure which allowed me to capture the movement of traffic as well as a car at the light for a few seconds. This longer exposure allowed for a fade of the car at the light to happen in the front of the picture as well as the headlights of other cars to occur int he back of the photo.
My third selected photo was a freeze motion photo. I selected this because of hoe much white space there is. I find it interesting how little is going on around the frozen coin in the center of the photo. I also like this photo because of how the bright lights of the classroom match well with me exposure to allow for a crisp image of the coin.
My final image was a zoomed in photo of a frozen coin. I like this image because of how much detail is able to be seen and the shadow coming off of the edge of the coin. Though this image is similar to my previous frozen motion photo the rigid coin standing so straight creates an interesting image.

Success/Challenges:
After this first project and my first time really using a digital camera I realized how hard photoshop is to use. Since I am very new to the program the movements and controls are hard and easy to forget. I have a new respect for photo editing and the entire photo process. Something that I felt I did successful in this project was my motion blur photos. I really like how I was able to experiment with the shutter settings to get unique and interesting photos of cars at night.

For my first image of motion blur I took a photo of a SMRT bus traveling down Bukit Tima Road in the evening. With the fence focused on in the front the bus's display board has created a blur line above where one would expect. Compared to my other motion blur image the headlights have been blowed at half a meter above the ground creating a uniform blur. In this image the blur is at the top of the image drawing the eye up past the still fence.

For my second motion blur image I have the very standard headlight blur of cars but with a half blurred parked car. With this half blurred car one is able to see through it to more motion blur of traveling car headlights in the background. This image was also taken in the evening allowing for the headlights to look like stars do to the stability and shutter speed of the photo.

In this frozen image I took the photo with little zoom allowing for a lot of white space around the frozen coin in the center. With all the light in the classroom the coin almost reflects life while it stands so still on the table. This image was take early on in the unit but I enjoy how crisp and in focus the coin is.


The blog post: The digital contact print is too large for the web page. This can be reduced in size, or make adjustments to the web page width to fit the digital contact print.
The explanation of the shutter does not explain how it affects the subject of the image. The post is not in chronological order (explanation of the shutter and how it affects the image, digital contact print, description of the digital contact print, final edited images with a description, successes and challenges to the project). There is no explanation of the final images.
The images: The two examples of freezing images are very similar and could very well be the same image zoomed in. A variation of selections would be helpful.